6×8 shed plans for storage

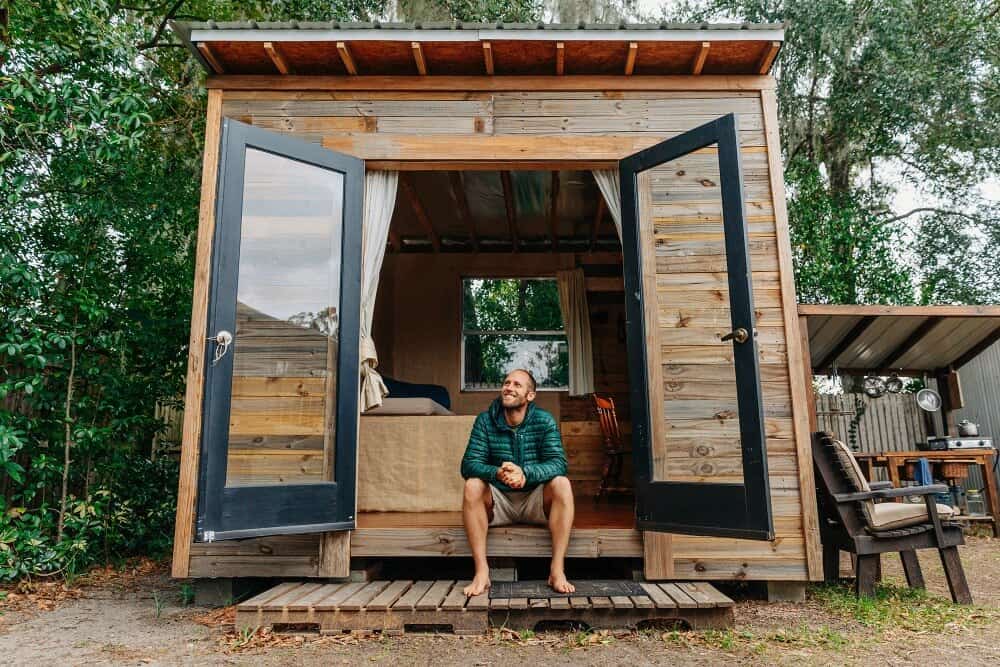
6×8 plans for building a storage shed

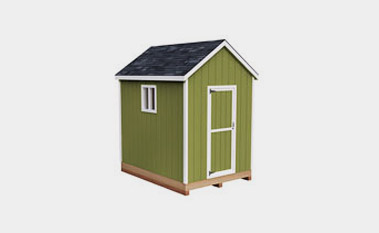
A 6 x 8 storage shed is a very popular size for many homeowners. The dimensions of the building are 6 ft by 8 ft which is a nice size for storing larger tools, lumber, and other items. These are the best used for 6×8 shed plans.

There are also many options in terms of choosing materials for your new shed such as wood or metal. A great advantage to this size of the shed is that you can move it if needed and it will be easier to store if you ever need to find space for it.

Is a six by eight shed the right size?

A 6×8 storage shed is a great option for small-space living. It is usually small enough to fit in one corner of the backyard and can be used for tools, gardening supplies, or even as a temporary garage. The dimensions are 6 ft by 8 ft.

One of the most popular garden sheds on the market today is the 6×8 storage shed. This size often fits in one corner of the yard and has adequate space inside to store anything from gardening supplies to tools or maybe even a temporary garage if needed.

The dimensions are 6 ft wide by 8 ft deep which gives you a total square footage of 56 sqft when it’s all said and done.

The 6×8 wood shed

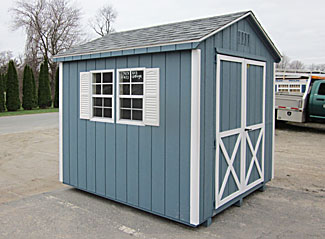
A 6×8 wood shed is a great way to store your outdoor belongings. It can be used to store anything from lawn equipment, gardening tools, patio furniture, or even an ATV.

The average cost of a 6×8 wood shed is around $1,500-2,000. One option for purchasing such a shed is to buy directly from the manufacturer and have it delivered on-site. This will run about $1,000-$2,000 depending on the size and location of the delivery.

Are Free 6×8 Plans the right choice?

Another option for purchasing a 6×8 wood shed is to purchase one that has already been assembled and installed at a local home improvement store like Lowe’s or Home Depot for $1,500-$4,000 depending on the size of both the shipping container and thickness of sheeting material used in construction.

Another option available at these retailers are pre-built sheds that are built with thicker materials but come with less features than those constructed by manufacturers; these cost between $500-$800 depending on size.
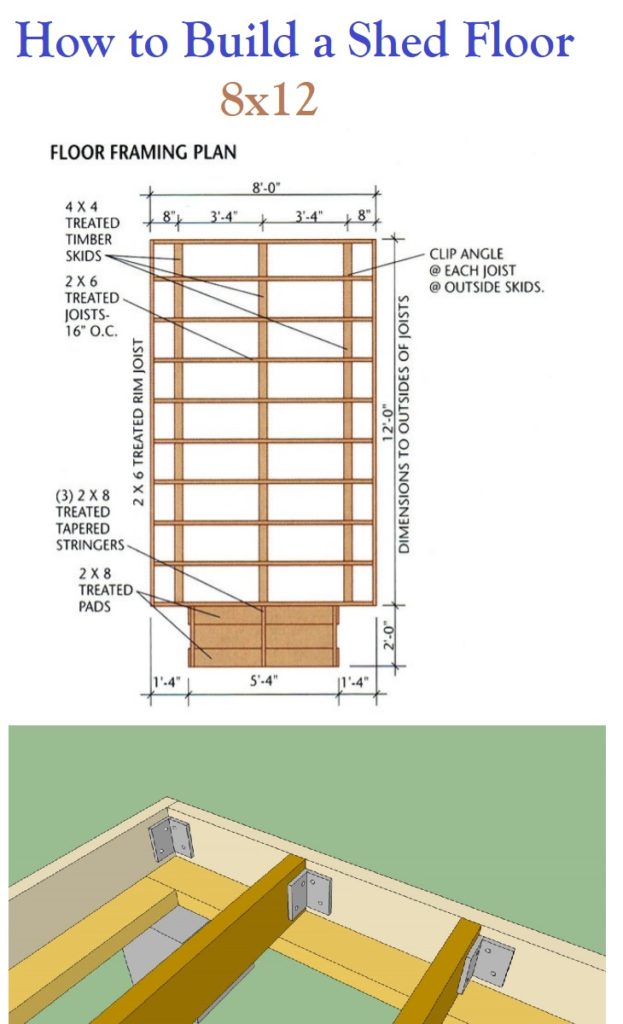
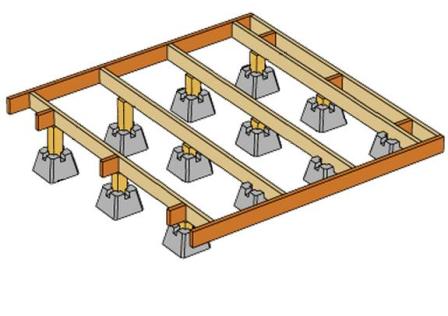
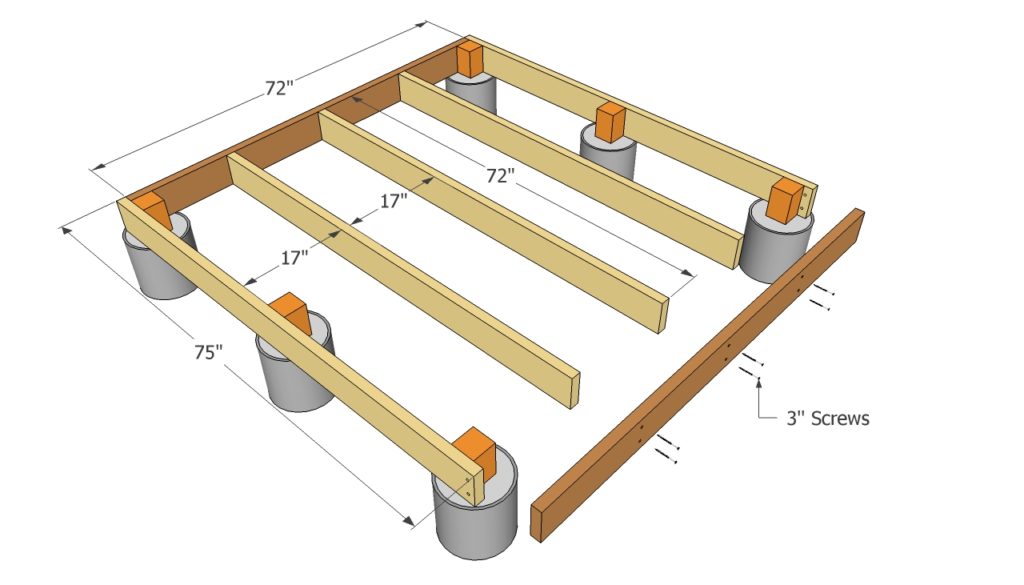
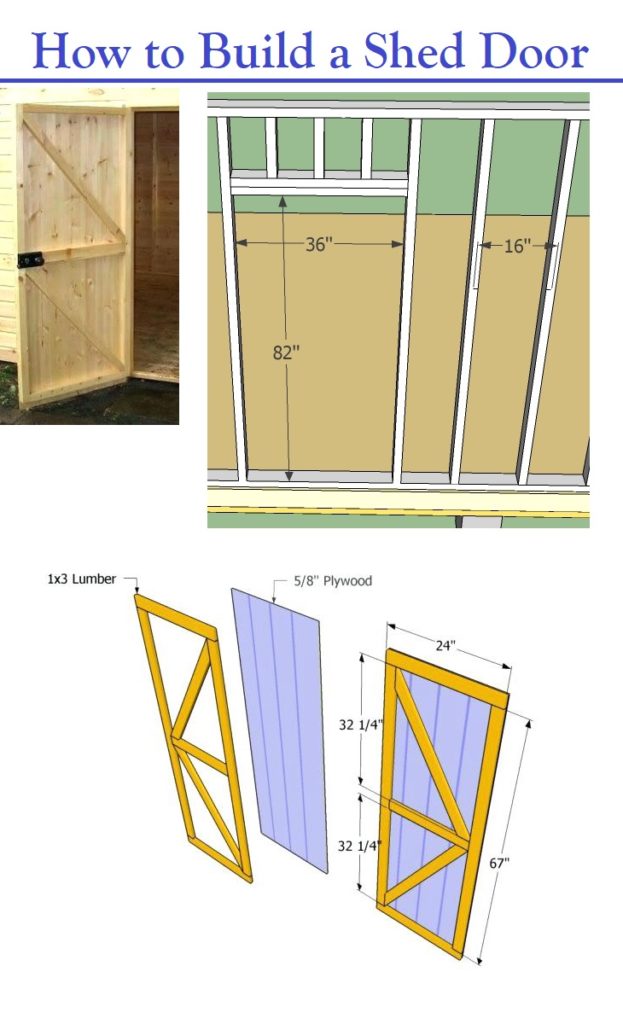
Chose shed plans with, blueprints, door, roof, and floor

6×8 shed building plans, woodworking plans. A 6×8 shed kit is a great way to get the perfect size for your needs. You can use it as a storage space for anything from gardening tools to lawnmowers.

A 6×8 shed kit is a large enough size that you will not have any trouble finding enough room for all of your belongings.

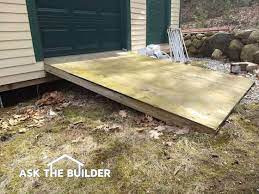
A concrete foundation is a good option for a small shed
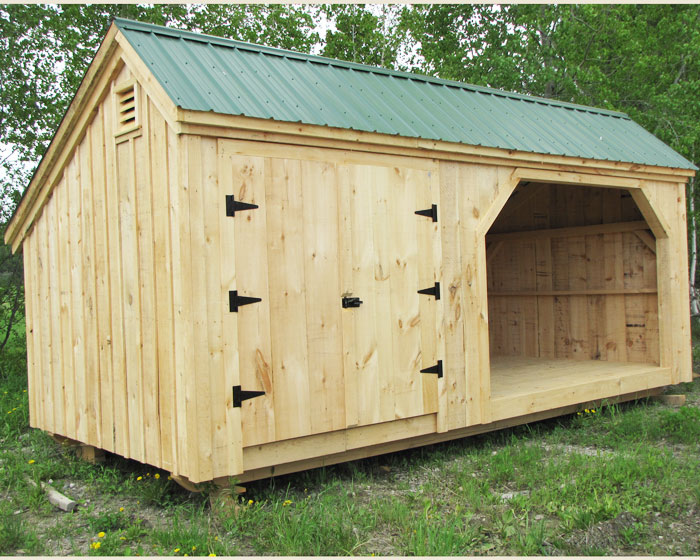
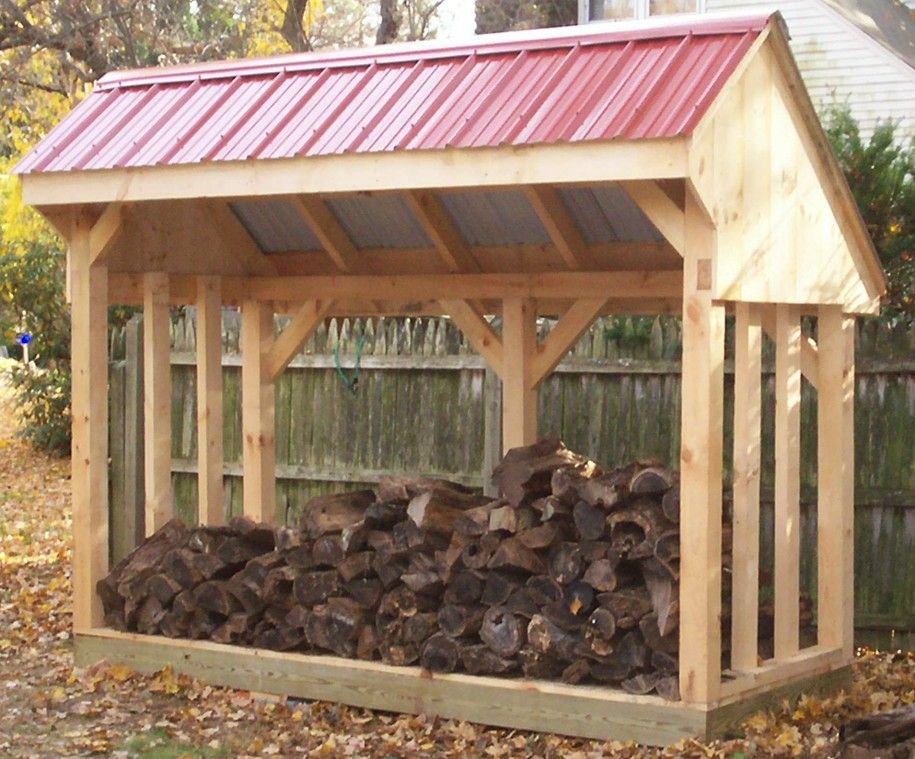
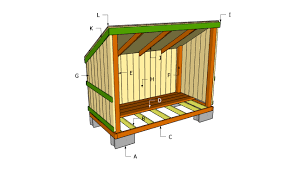
6×8 lean to shed are built for storage and working on projects. They are usually framed with 2×4’s and covered in metal roofing or metal roofing.

A 6×8 lean-to shed is built with a set of posts at the front, back, and corners of the building. These posts also serve as framing for the door opening in the front wall.

Once these posts are framed in, they can be filled with 2×4 studs or sheet goods perpendicular to the post frame (or plumb). The wall height should be 4′-9″ high with a sloping pitch towards the rear of 5:12 (1/2 inch rise per foot) A 6×8 lean to shed can have windows and doors installed as needed. Windows should be 3 feet from ground level for easy access.

A 6×8 lean-to shed is a small and simple shed that is built with a roof, but no walls. It has enough space for some tools and a car but is more often built to be used as an outdoor workspace.

The construction of the lean-to shed is not complicated and it can be done by someone who has experience with cutting wood.

The way this type of lean-to-shed works is that one side of the roof rests on the ground while the other side leans against the wall of another structure like a house or garage.

This provides shelter from sun, rain, wind, and snow for whoever might be working at one end of this type of building. They are usually about six feet wide by eight feet long so they can easily fit in tight spaces such as an alleyway or open corner near your house or garage

Maybe your plans could be used to build a chicken coop

6×8 chicken coop is a space-saving, easy-to-build enclosure that provides shelter and protection while keeping your chickens safe from predators.

The 6×8 chicken coop can be built with a variety of materials, such as lumber, metal sheeting or PVC pipe, and plastic sheeting. The design consists of two 3-foot by 9-foot panels attached together side by side on their long sides with generous overlap at the corners.

A 6×8 chicken coop is also a very manageable size for most people with a small acreage. The plan layout is similar to that of a larger coop, but it’s scaled down to fit the smaller space.

You can have up to 4 nest boxes or 2 roosting perches in the 6×8 chicken coop. Most people would use the roosting perches as nests because this would then allow them more nesting boxes for their chickens.

Your shed plans could include shelves that can mount to the walls

The main difference between this and other sizes is that you’ll need shelving units to store feed and water on each side of the 8-foot-long wall, instead of along one side like in the 10×12 design.

This will help make sure you have enough room for your chickens to move around comfortably while they are inside the coop, and will cut down on some feed wastage as well!

With a shed kit, you wouldn’t need free 6×8 shed plans

6×8 wood shed kit – Sheds for sale Sheds are essential to any household because of their practical and economical qualities. If you’re one of the people that have been looking for sheds for sale, then it’s time to stop your search.

These sheds come in many shapes and sizes, which is perfect if you’re planning on adding a new shed to your property. One of the many things that make these sheds great is they can be installed with ease. This means if you don’t have a lot of skills or experience in carpentry, this will not hinder your ability to build a shed.

6×8 storage buildings, 6×8 Storage Buildings A 6×8 storage building is perfect for storing garden equipment, tools, and other items that you don’t need to use on a daily basis.

The size of this shed is good for people with limited space in their backyard. You can use the rectangular shape to your advantage and create a windowless room by installing a door at each end of the building.

Buy or Build a Shed

buy or build a shed

Should you buy or build a shed?

A storage shed is an excellent choice if you find yourself needing to store a few of your belongings in a new area. While you’ll be able to buy or build a shed, there are some pros and cons that you just might need to consider before making that final decision to buy or build a shed. Please browse the knowledge below which is able to highlight the pros and cons of building a storage shed, shopping for a storage shed, and the materials commonly used for sheds.

Pros and Cons of Building a Shed

As the builder of the shed, you get the option of choosing the floor plan, size, and style. This is vital a pro because your end result will be a storage shed to serve your precise desires. Additionally, it’ll be a touch cheaper to create a personal storage shed since you alone will only need to purchase the tools and materials. Along with being less costly, you’ll be able to build your storage shed consistently with your shed plans and on your schedule, which can be significantly faster than having a professional build it for you on their schedule. Professionals typically juggle many different shed projects and will not dedicate themselves absolutely to your specific shed building project.

While you will have personal control over the design of your shed, you will need to dedicate time, effort, and energy while building a storage shed. If you are going to choose your own shed plans and create your own shed, you must be ready to examine the complete project throughout, which will require some organization and careful planning. These are just a few tips on whether to buy or build a shed.

Pros and Cons of Buying a Shed

If constructing your own shed with your own storage shed plans will take an excessive amount of time or you’d rather get one for the convenience, purchasing a storage shed will be your best choice. You may be compelled to pay much more over constructing it yourself, however, you may be saving yourself an excellent deal of your time and energy. Additionally, if you have your shed designed and engineered by professionals, you’ll be able to be assured that it’ll be engineered and built properly.

While purchasing a storage shed can save you time, it sadly can be very costly, particularly if you hire an expert to create the storage shed. Normal storage shed prices can range between $300 and $1000, whereas hiring a contractor or builder may cost you up to $3500 with labor, materials, and extra costs. Not only will you be spending more money, but you will also lose a bit of creative control when it comes to your back yard storage shed. Overall, your budget to buy or build a shed and the use of your storage shed ought to be taken into account before you jump ahead and get a storage shed for your back yard area.

Pros and Cons of Common Shed Building Materials

Wood: Wood is that of the most aesthetically pleasing material to use for a storage shed, however, it is also the most spendy and tough material to use for your storage shed project. Wood sheds require solid foundations, which might be an undesired step within the shed building method. Wood sheds additionally require additional protection to repel insects, fungus, rot, and weather harm.

Metal: Metal storage sheds are much cheaper than wooden storage sheds and are not susceptible to fire and insect damage. However, cheaper metal sheds may rust over time, but more expensive aluminum storage sheds will be resilient to it. Overall, not very aesthetically pleasing as a shed and the sharp corners of the protruding metal could be hazardous to children.

Plastic: Plastic really isn’t the most cost-effective choice for shed material, however, it’s additionally lighter and more durable than wooden storage sheds. Additionally, a plastic storage shed requires the least amount of maintenance because it resists most forms of damage, such as insects and rot. Although, plastic sheds might not be so stylish or pleasing to the eye as do metal or wooden sheds do. Not a bad choice when deciding to buy or build a shed.

Vinyl: Vinyl is one of the higher choices because it is stronger than plastic or metal sheds. However, it is the most costly storage shed plan option. If you have the storage shed budget and want a shed that will stand up to the weather, varmints, and rot, vinyl sheds can be a great option.

Engineered wood: This type of wood resolves several of the issues normal wood materials encounter: dampness, bugs, and rot. Also, engineered wood may use more eco-friendly practices when using and growing certain trees needed since different type’s trees are used. Compared to normal wood, however, engineered wood for sheds may also be more expensive for the initial purchase. Homeowners should make sure the core layers are still made using high-quality wood.

Conclusion Buy or Build a Shed

If you’re handy with tools and have a free weekend (usually in the fall), building your own storage shed can be very rewarding. You’ll save a lot of money building a shed with your own shed plans. Of course, if you have an extremely busy lifestyle then you’ll no choice but to purchase a storage shed and have it delivered to your chosen site.

Shed Roof Tips

Frame the Roof of your shed.

  1. Cut two pattern rafters, following the RAFTER TEMPLATE. Test-fit the rafters using a 2 × 8 spacer block, then cut the remaining twelve common rafters. Cut eight rafters for the gable end overhangs—these do not have bird’s mouth cuts.
  • Cut the 2 × 8 ridge board at 156″. Draw the rafter layout onto the top plates and ridge board, using 16″ on-center spacing. The outsides of the outer common rafters should be 6″ from the ends of the ridge board.
  • Install the rafters. Reinforce the rafter-wall connection with metal anchors—install them on all but the outer common rafters.
  • Cut three 2 × 4 rafter ties at 96″, and clip the top outer corners so they won’t project above the rafters. Position each tie next to a pair of rafters as shown in the FRAMING ELEVATIONS. Facenail each tie end to the rafter with three 10d nails, then toenail each tie end to the top wall plate with two 8d nails.
  • Cut the gable-wall plates to reach from the ridge to the wall plates. Install the plates with their outside edges flush with the outer common rafters. Cut and install the gable studs, following the FRAMING ELEVATIONS.

How to Build a Shed Floor

how to build a shed floor

Building a Shed Floor can be easy

1. Excavate the building site and add a 4″ layer of compactible gravel. If desired, add an extension to the base for the optional wood ramp. Tamp the gravel thoroughly, making sure it is flat and level. This is the start on how to build a shed floor.

2. Cut three 4 × 4 treated timber skids at 144″. Arrange and level the skids on the gravel bed, following the FLOOR FRAMING PLAN.

3. Cut two 2 × 6 rim joists at 144″ and ten joists at 93″. Mark the joist layout onto the rim joists, following the plan. Assemble frame with 16d galv. common nails; be sure to check each joist for crowning and install it with the crowned edge up.

4. Set the floor frame on top of the skids and measure the diagonals to make sure it’s square. Install metal clip angles attach joist along the two outer skids, using 1 1/2″ joist hanger nails and 16d galv. common nails, and toenail each joist to the center skid with 16d galv. nails.

5. Install the tongue-and-groove floor sheathing, starting with a full sheet at one corner of the frame. Use 8d galv. nails driven every 6″ along the edges and every 12″ in the field.

It’s up to you to decide what to support your shed floor with. The floating blocks that you can purchase at your local home store is the most common method used. If you want a really want to show others on how to build a shed floor the right way, digging footings makes for the most solid support.

How to Build a Shed Door

how to build a shed door

Build a Shed Door that will last

The shed door seldom gets the maximum amount attention as would the roof and even the foundation, most of the time folks would simply purchase a pre built door, measure it and install it and think that the job is done. But since the shed door is the single part of the shed that gets the most action, it’s highly likely that it would be the first storage shed item to receive damage. And with storage sheds, the door can vary a whole lot in terms of size and the way it opens. Depending on what you plan to keep inside your shed, you may either need a small sized door or one where a small garden tractor can pass through.


Most storage sheds though are used for keeping large tools like a wheel barrow or a grass cutter, so it is inevitable that one day it may either break off its hinges or develop a big hole because of the occasional banging and hitting of your equipment. So it’s important to have a sizeable shed door that will accept your largest size machine. And to confirm that your door can continue to handle wear and tear you’ve got 2 choices once on how to build a shed door, the ledged door and therefore the ledged embraced door.


The first thing that you need to do is to ensure that you have all the tools that you will need before you learn how to build a shed door. The tape measure is your best friend. It is important that your door fits like a glove on its frame. Take into account the small space that your hinges will occupy. You don’t want a shed door that is not leveled. The top half may either be hitting the frame and there’s a gap on the lower half, or vice versa. Not only will you not be able close your door and lock it properly, but you can also cause damage to your door frame.


When choosing lumber to use for building your shed door, you can either use a rough cut or a finish cut. But what is important is that the lumber is already completely dry; if not, there can be shrinkage in the future when the wood loses its moisture. Usually, lumber that is 1 inch thick is used. Some diy shed builders choose to use green or brown treated wood when deciding on how to build a shed door.


After doing your measurements, you can now use your saw to cut your boards. After cutting, lay down all your boards, put them together and make your final measurement. You should now cut the lumber you will use for your braces. Typically a door brace would need three pieces of lumber, one goes across the top side of the door, one on the bottom side and one longer piece to go across diagonally the length of the door making a Z-shape. Nail or glue them all together.
Now you can measure the hinges on your door jamb and to your shed door. You can now just screw in the hinges and your door is done. If you want to put a handle or a gate latch, you can do so before attaching the door to its frame.

How to Build a Shed Ramp the Right Way

How to Build a Shed Ramp

How to Build a Shed Ramp

A shed ramp is extremely important to any shed that you want to store any type of small riding lawn mower or maybe even a bigger machine like a riding lawn tractor. A ramp can be beneficial in moving your equipment in and out of your shed.  This is a vital part when learning how to build a shed ramp for any backyard garden or barn shed. You also need to make sure that your ramp will work to your advantage you need to build it properly.

There are two main things to consider for your shed ramp plans. Size and slope. Make sure to consider these when building a garden shed ramp. Along with slope and size, there are a few other factors needed when learning how to build a shed ramp.

Only $37 for 12,000 shed plans

Here are those factors.

The slope of the ramp – double-check the location of your backyard storage shed. You don’t want to build a shed and later find out that the storage shed ramp won’t fit. The length of your ramp relies on the slope that you just have chosen. Choosing the slope of your ramp is extremely important as this can be the determinant of the convenience of use and its safety.  It is also imperative that you plan the slope well and consider what type of equipment will be used on the shed ramp.

Safety – a poorly planned steep slope would clearly create problems for you to defy gravity, once you start moving your machinery in and out of the garden shed.  If you’re pushing a heavy mower up a steep ramp, there is a greater chance that you might slip and get crushed. Safety needs to be an important factor when building a shed ramp. Besides, building codes need to be considered. Most require an 8 to 1-inch slope. Besides building codes on how to build a shed ramp, also research other codes at your local city office.

Ease of use – while most ramps don’t need to support a car or truck, but you still need to build the shed ramp to support your riding lawn mower like mentioned earlier.  You may start to think that having a reasonably smart slope and enough driving area would be enough, that isn’t the case.  Many of those machines have low hanging mower decks that may hang up on way into the storage shed. Just one more thing to think about when considering how to build a shed ramp.

The surface of the ramp – be aware of the surface of the wood, steel, or concrete, rain, and other factors may cause your ramp to become slippery thus increasing the risk of accidents. To prevent this, use rubberized flooring or anti-slip paint can help decrease the risk of falling on your shed ramp. Galvanized wire or custom metal sheets with dull spikes can even facilitate to increase the slip resistance of your ramp.

These are the most important essential factors that you just must always bear in mind when building a shed ramp. Include this in your shed ramp plans so that you will not forget about any of these shed ramp tips.

Just like when you use safety glasses around power tools, your new storage shed ramp needs to fit the needs of your machines you will be storing in the shed.

shed ramp plans

While your outdoor garage is getting cramped, it’s time to have a storage shed along with a shed ramp for storing yard tools, gardening supplies, pool chemicals, and other outdoor equipment. But as most permanent storage sheds are placed on a foundation pad or footing, you get a level difference of 9 to 14 inches above the ground.

Hence, building a shed ramp is essential when you need to get heavy garden machinery and riding movers in and out of the storage shed. It makes loading and unloading of heavy equipment from your shed or garage safe and easy thereby reducing the risk of accidents.

So here is a brief guide and tips on how to build a ramp for a shed:

Why do I need a shed ramp?

Before you can have your storage shed placed, you prepare a solid leveled base including gravel or crushed stone with either treated wood foundations or concrete foundation blocks. For large sheds, you require strong foundations to uniformly transfer the load.

Similarly keeping in view the overall topography of the area you can’t place storage sheds directly on the ground. So, due to the level difference of the floor level with the adjacent ground level you have to build a storage shed ramp of suitable length and slope provision for safe and stress-free movement of heavy equipment in and out of the garage. 

How long should I make the shed ramp?

Choosing the length and slope of the shed ramp is a very important part of your shed planning for getting the maximum benefit out of it. Whether your using shed ramp plans or have your own shed ramp ideas, an ideal shed ramp will have a shallow slope and excess length for ease of use. But you have to make sure that there is sufficient space available in front of the shed.

How to build a shed ramp with a good slope angle

The slope and length required are governed by the height from the external ground level to the shed floor. Regarding the slope selection here are some recommendations for building a shed ramp:

For public ramps, the steepest slope allowed is 1:12 which means one-inch rise for every 12 inches horizontally. This slope is governed by the ease of use for wheelchair users.

For general public buildings, the recommended maximum slope is 1:8 which means one-inch rise for every 8 inches horizontally. So, if you go with 1:8 and your floor level difference is 12 inches, the required length of the ramp will be 8 feet.

If you don’t have that much longer available you can go steeper up to about 1:4 but it will increase the risk of slipping so you have to make adjustments accordingly. You can use anti-slip paint or staple down the metal sheet with the ramp surface.

Regarding the width of the ramp for the shed, you should at least provide six inches wider ramp on both sides of your door openings. This will make it easy for the machines to move in and out.

 How to build a ramp for a shed?

Now to start you need to provide a ledger board by mounting it flush with the face of the shed floor. You may have to rip off the framing of the shed if it lips underneath the door. A Ledger board of 2×6 inches is commonly used that can be anchored underneath the shed door with lag screws and washers.

Shed ramps on the ground at the proper angle.

The next step is to mark the area of the shed ramp on the ground, keeping in view the length you selected in the previous step. Measure the distance from the face of the shed and dig holes for the supporting concrete blocks underneath the ramp.

Shed ramps on blocks to protect the joists

After fixing the concrete blocks you now have to measure and cut stringers. Measure the distance from the far edge of the concrete blocks and the ledger board. Cut the stringers up to this much length and secure each stringer with screws into the ledger board.

Shed ramps should have proper joists spacing

Keeping in view the spacing between the stringer, you may have to provide a spacer in between the stringers. So, cut the blocks and screw them between the stringer. The last step is to cut the ramp boars to length, predrilled holes, and screwed the boards with the stringers.

Make sure to secure the ramp boards properly with the stringer and into the concrete (using concrete anchors).

How to Build a Shed Cheap

how to build shed cheap

How to build a shed cheap with your own design.

It is perceivable why most owners nowadays have either designed their own small shed or are aiming to build one themselves.  The ever-growing desire that we tend to all have to build a storage shed has led to a slight boom in construction and it’s become unreachable for many property owners to own a back yard shed. This has led many to research how to build a shed cheap using some free shed plans.  Many have pondered the fact that several of their tools, seasonal items, and other belongings, that don’t seem to be suited to be kept within the house, have dominated their garage. Then what happens is that their garage has lost its main purpose, to park their cars safely.

This increasing desire for how to build a shed cheap isn’t solely an issue in suburbs and for small towns, individuals spread out in rural areas are also experiencing storage problems even though they already own farms and barns, they still need to know how to build a shed cheap in order to solve their storage problems. Farmers machinery is quite massive and costly, they need a proper storage shed to protect those expensive items. It’s important to keep that machinery out of the elements and protected from intruders as well.

This is where a cheap shed comes in. Typically more affordable than the same old storage or garden shed, a cheap shed could be a viable answer for anyone seeking to free up that extra space in the garage or house. How to build a cheap shed will be your best option. Not just to free up storage space from other areas, a cheap shed may also provide a perfect place to store your lawnmower.  For those that have more money and have continuously dreamt of taking the country to the suburbs, a quaint very stylish cheap shed can be built as a man cave or a she shed for your little garden getaway. You can even construct your shed to resemble a log cabin.


But before you rush out to get some lumber, or any other building materials you wish to use, stop first and think. Your building project is going to go a lot smoother if have the right plans on how to build a shed cheap. Designing your own cheap backyard shed would be simple enough if you recognize what plans will work best. You have to contemplate the dimensions of your cheap garden shed counting on what you intend to store inside.  The materials you’re about to use will also be related to the weather in your town and how much money you have in your banking account.  You should also be able to first determine your local resources so that you won’t have a hard time knowing where to get the materials you will need.

Having instructions on how to build a shed cheap beforehand can prevent you from purchasing excess materials, plus, you’ll be ready to save time and effort mid-project looking for things that you need. The design doesn’t end with the final siding material.  Although this is often the foremost vital piece that your farm shed is sturdy and robust enough to face up to harsh atmospheric condition, especially the roof, you will also need to design your interior, to maximize the space you have.

There are several downloadable how to build a shed cheap plans out there for you.  Some of these storage shed plans are even free.  You will be ready to realize a number of these plans and styles and simply tweak them to be ready to produce your own style to best fit your requirements.

How to Build a Shed Step by Step

how to build a shed step by step

Have you finally came to the decision to build a wooden storage or garden shed? Here a few tips to get you started on how to build a shed step by step.

While most folks have already decided that a wooden storage shed could be a necessary addition to their back yard, several more folks have procrastinated because they feel that they just can’t do it on their own or they don’t have the extra funds to hire someone to build the shed. While some do have the talents to construct their own storage shed, many of them have the tendency to postpone the construction because they feel the end product might not meet their standards.

The most important tip is having a detailed shed plan that you can follow step by step. This would be the best way to have a problem-free building project. A detailed shed building plan takes out the guesswork while you’re doing the project saving you, your money, time and effort. Also, before you even truly begin to construct your storage shed, you may be able to purchase and prepare all the materials ahead of time by studying the easy to follow shed building plans. Plus you’ll be able to develop a decent timeframe and figure out step by step instructions on how to build your shed.

You should review these two shed building tips first before you even start building your backyard shed.

First, you need to pick that perfect backyard spot to build your new shed. Avoid sloping land areas and make certain that there aren’t any cables, wires, pipes running beneath it. Second, you’ll need to visit your local zoning and planning commission and show them your building plans. This way, you can be assured that you will have no problems with the authorities later on.

Now let’s start building that storage shed.

It is imperative that you do have all of your tools and materials ready before building your chosen shed. The wood, in fact, is your most single vital material. You also need tools like hammer, saw, nails, hinges, roof tacks, and shingles, etc.

Based on your plans, gather up all of your wood and cut all the pieces to the proper size.

If you’re employing a concrete foundation, prepare your cement.

With any type of storage shed structure, you always start and build from the bottom.

Start together with your floor deck moving on into your walls, windows, doors then on to your roof.

Make sure that your framing is secure and a solid stake is driven securely to the ground so that you have a sturdy post to attach your frame too.

Never skimp on nails or screws, make sure whatever fastener you use attach them securely to all parts of your wooden storage shed.

Try to wiggle or shake your walls to envision if they’re secure which there are no unwanted gaps. Any weak points should be strengthened.

Your roof ought to solely be designed to be strong and make certain that the framing is robust.

Choose a building material that will withstand the weather in your area. A metal roof is best in snowy areas.

If really necessary add more wood studs or posts as you want to make sure that your wood storage solid, secure, and sturdy. Remember, the bigger your shed is, the more pillars it would need.

Shed Plans 10×20 Basics

shed plans 10x20

How to Build a Storage Shed Using Shed Plans 10×20

It can be very easy to suddenly be overwhelmed by all your possessions. One minute you’re shopping for them thinking how you possibly lived without that item, and then the next minute you discover that you have never used it or just have used it once. They are now just clutter and making your home seem small. If that’s the case then you definitely need shed plans 10×20 to build a shed, especially if your garage has been regarded as an abyss of clutter and declared a danger zone.

Don’t feel ashamed, there are tons of people who have been known as hoarders, keeping things they don’t really need. But, aside from selling the things that you can part with, you can just build a storage shed for those mementos or tools you can’t really part with.

Primarily, if you don’t have the carpentry skills, even the basic ones, you can still build your own storage shed using shed plans 10×20 and save a lot of money. You can do this by using by using storage shed kits and pre-fabricated storage shed parts. Many home specialization stores today carry these kits.

There are also different choices in materials when building a storage shed, whether doing it from scratch, using shed plans 10×20, or by using kits. The most common are wood, steel, and vinyl. The latter is because they are rust-proof and looks good without the need for painting.

Building a storage shed will allow you to discover many of the things that professional carpenters know, like the many small details that complete the work. For example, with a wooden shed, the lumber you choose can make a tremendous difference. Dried and cured wood is the best as they don’t tend to split when it’s dry season. Green wood is still moist and can be easily split when dry.

But more importantly, learning to build a storage shed with shed plans 10×20 from scratch will not only give you a useful and beautiful shed, but it will also provide you with an opportunity to discover and learn simple carpentry with an easy yet fulfilling project. Any aspiring Do-It-Yourselfer will find this a very enriching experience.

But before anything else, to avoid excessive time consumption and errors, it’s essential that you have a plan first. Keep in mind what you need to do and follow your plan to the T. This will help you save ob costs and on your time and effort as well.

If you don’t have any books to help you out with your planning and learning basic carpentry, the internet is your savior. Here you can find a plethora of resources to help you in every step of the way. There are software programs to make the planning stages easier and also show you how to save on costs.

Plus, when you build a storage shed, you can involve the whole family, which can strengthen the bonds. Just make sure to keep everything safe by using safety equipment, like goggles. So why bother hiring someone else to do the job for you?

Build a Firewood Shed

Firewood shed

Build a Firewood Shed to Keep Your Firewood Dry and Ready

Firewood cost, either you bought them or you chopped them yourself. In the former you shelled out your hard earned money and in the latter you spent a lot of energy and time. So if your firewood gets wet or becomes filled with moisture, all your money and your efforts will just go down the drain. A wet firewood will not burn properly as we all know, and if you live in an area where rain and snowfall is frequent, it can be virtually impossible to keep your wood dry. Build a firewood shed, the key to this predicament and you can be sure of having dry firewood every time you need it.

The location of your firewood shed is one of the most important decision you should make It should be in an area where water does not pool around the shed, yet it should be near your home so that it would be easy for you to get firewood whenever you need it. You certainly wouldn’t want to walk far just to get some when it’s raining hard or there is heavy snowfall. Also, try to build a raised floor so that moisture from the ground would not easily seep inside the shed. Wet wood easily gets rotten and decomposes.

With regards to the roof of your firewood shed, you should make sure in your plans that it has a high steep and is slanted. This way, snow and rain will easily slide off and would not get inside to the firewood. This goes the same for the foundation, making it higher from the ground and providing a slant to slide snow and water away from the shed.

Most firewood sheds are built with only three sides. Only three walls are provided and the fourth side left open. This is necessary as this allows airflow which in turn allows the firewood to dry properly. But because of this open side, it would also be easy for rain and snow to be blown inside by the wind. To avoid this or to minimize moisture, it is best that the open side should not face the direction of the wind.

To further prevent moisture from seeping into your firewood, when you build your firewood shed put a layer of plastic on the floor and to allow good airflow for drying, under your woodpile stack your firewood on off-cut lumbers. Most firewood shed are not really that big, they are easy to make and don’t require as much cost as most typical storage sheds. With just a couple of lumber and nails, you can be assured that you will have dry and effective firewood ready to build a roaring fire for a comfortable warmth.

Always remember when you build a firewood shed or start any project, having shed plans is the best way to ensure that you will have a worry-free time when you’re in the actual process of building the shed. So get your hands on a firewood shed plan first.