How to Build a Shed Floor

how to build a shed floor

Building a Shed Floor can be easy

1. Excavate the building site and add a 4″ layer of compactible gravel. If desired, add an extension to the base for the optional wood ramp. Tamp the gravel thoroughly, making sure it is flat and level. This is the start on how to build a shed floor.

2. Cut three 4 × 4 treated timber skids at 144″. Arrange and level the skids on the gravel bed, following the FLOOR FRAMING PLAN.

3. Cut two 2 × 6 rim joists at 144″ and ten joists at 93″. Mark the joist layout onto the rim joists, following the plan. Assemble frame with 16d galv. common nails; be sure to check each joist for crowning and install it with the crowned edge up.

4. Set the floor frame on top of the skids and measure the diagonals to make sure it’s square. Install metal clip angles attach joist along the two outer skids, using 1 1/2″ joist hanger nails and 16d galv. common nails, and toenail each joist to the center skid with 16d galv. nails.

5. Install the tongue-and-groove floor sheathing, starting with a full sheet at one corner of the frame. Use 8d galv. nails driven every 6″ along the edges and every 12″ in the field.

It’s up to you to decide what to support your shed floor with. The floating blocks that you can purchase at your local home store is the most common method used. If you want a really want to show others on how to build a shed floor the right way, digging footings makes for the most solid support.

How to Build a Shed Door

how to build a shed door

Build a Shed Door that will last

The shed door seldom gets the maximum amount attention as would the roof and even the foundation, most of the time folks would simply purchase a pre built door, measure it and install it and think that the job is done. But since the shed door is the single part of the shed that gets the most action, it’s highly likely that it would be the first storage shed item to receive damage. And with storage sheds, the door can vary a whole lot in terms of size and the way it opens. Depending on what you plan to keep inside your shed, you may either need a small sized door or one where a small garden tractor can pass through.


Most storage sheds though are used for keeping large tools like a wheel barrow or a grass cutter, so it is inevitable that one day it may either break off its hinges or develop a big hole because of the occasional banging and hitting of your equipment. So it’s important to have a sizeable shed door that will accept your largest size machine. And to confirm that your door can continue to handle wear and tear you’ve got 2 choices once on how to build a shed door, the ledged door and therefore the ledged embraced door.


The first thing that you need to do is to ensure that you have all the tools that you will need before you learn how to build a shed door. The tape measure is your best friend. It is important that your door fits like a glove on its frame. Take into account the small space that your hinges will occupy. You don’t want a shed door that is not leveled. The top half may either be hitting the frame and there’s a gap on the lower half, or vice versa. Not only will you not be able close your door and lock it properly, but you can also cause damage to your door frame.


When choosing lumber to use for building your shed door, you can either use a rough cut or a finish cut. But what is important is that the lumber is already completely dry; if not, there can be shrinkage in the future when the wood loses its moisture. Usually, lumber that is 1 inch thick is used. Some diy shed builders choose to use green or brown treated wood when deciding on how to build a shed door.


After doing your measurements, you can now use your saw to cut your boards. After cutting, lay down all your boards, put them together and make your final measurement. You should now cut the lumber you will use for your braces. Typically a door brace would need three pieces of lumber, one goes across the top side of the door, one on the bottom side and one longer piece to go across diagonally the length of the door making a Z-shape. Nail or glue them all together.
Now you can measure the hinges on your door jamb and to your shed door. You can now just screw in the hinges and your door is done. If you want to put a handle or a gate latch, you can do so before attaching the door to its frame.

How to Build a Shed Cheap

how to build shed cheap

How to build a shed cheap with your own design.

It is perceivable why most owners nowadays have either designed their own small shed or are aiming to build one themselves.  The ever-growing desire that we tend to all have to build a storage shed has led to a slight boom in construction and it’s become unreachable for many property owners to own a back yard shed. This has led many to research how to build a shed cheap using some free shed plans.  Many have pondered the fact that several of their tools, seasonal items, and other belongings, that don’t seem to be suited to be kept within the house, have dominated their garage. Then what happens is that their garage has lost its main purpose, to park their cars safely.

This increasing desire for how to build a shed cheap isn’t solely an issue in suburbs and for small towns, individuals spread out in rural areas are also experiencing storage problems even though they already own farms and barns, they still need to know how to build a shed cheap in order to solve their storage problems. Farmers machinery is quite massive and costly, they need a proper storage shed to protect those expensive items. It’s important to keep that machinery out of the elements and protected from intruders as well.

This is where a cheap shed comes in. Typically more affordable than the same old storage or garden shed, a cheap shed could be a viable answer for anyone seeking to free up that extra space in the garage or house. How to build a cheap shed will be your best option. Not just to free up storage space from other areas, a cheap shed may also provide a perfect place to store your lawnmower.  For those that have more money and have continuously dreamt of taking the country to the suburbs, a quaint very stylish cheap shed can be built as a man cave or a she shed for your little garden getaway. You can even construct your shed to resemble a log cabin.


But before you rush out to get some lumber, or any other building materials you wish to use, stop first and think. Your building project is going to go a lot smoother if have the right plans on how to build a shed cheap. Designing your own cheap backyard shed would be simple enough if you recognize what plans will work best. You have to contemplate the dimensions of your cheap garden shed counting on what you intend to store inside.  The materials you’re about to use will also be related to the weather in your town and how much money you have in your banking account.  You should also be able to first determine your local resources so that you won’t have a hard time knowing where to get the materials you will need.

Having instructions on how to build a shed cheap beforehand can prevent you from purchasing excess materials, plus, you’ll be ready to save time and effort mid-project looking for things that you need. The design doesn’t end with the final siding material.  Although this is often the foremost vital piece that your farm shed is sturdy and robust enough to face up to harsh atmospheric condition, especially the roof, you will also need to design your interior, to maximize the space you have.

There are several downloadable how to build a shed cheap plans out there for you.  Some of these storage shed plans are even free.  You will be ready to realize a number of these plans and styles and simply tweak them to be ready to produce your own style to best fit your requirements.

How to Build a Shed Step by Step

how to build a shed step by step

Have you finally came to the decision to build a wooden storage or garden shed? Here a few tips to get you started on how to build a shed step by step.

While most folks have already decided that a wooden storage shed could be a necessary addition to their back yard, several more folks have procrastinated because they feel that they just can’t do it on their own or they don’t have the extra funds to hire someone to build the shed. While some do have the talents to construct their own storage shed, many of them have the tendency to postpone the construction because they feel the end product might not meet their standards.

The most important tip is having a detailed shed plan that you can follow step by step. This would be the best way to have a problem-free building project. A detailed shed building plan takes out the guesswork while you’re doing the project saving you, your money, time and effort. Also, before you even truly begin to construct your storage shed, you may be able to purchase and prepare all the materials ahead of time by studying the easy to follow shed building plans. Plus you’ll be able to develop a decent timeframe and figure out step by step instructions on how to build your shed.

You should review these two shed building tips first before you even start building your backyard shed.

First, you need to pick that perfect backyard spot to build your new shed. Avoid sloping land areas and make certain that there aren’t any cables, wires, pipes running beneath it. Second, you’ll need to visit your local zoning and planning commission and show them your building plans. This way, you can be assured that you will have no problems with the authorities later on.

Now let’s start building that storage shed.

It is imperative that you do have all of your tools and materials ready before building your chosen shed. The wood, in fact, is your most single vital material. You also need tools like hammer, saw, nails, hinges, roof tacks, and shingles, etc.

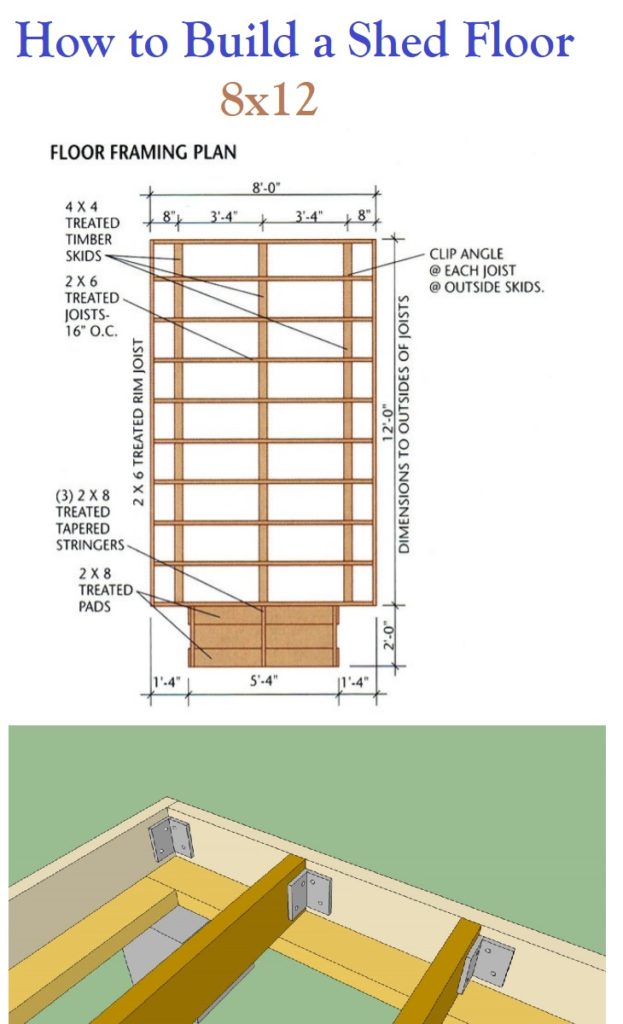
Based on your plans, gather up all of your wood and cut all the pieces to the proper size.

If you’re employing a concrete foundation, prepare your cement.

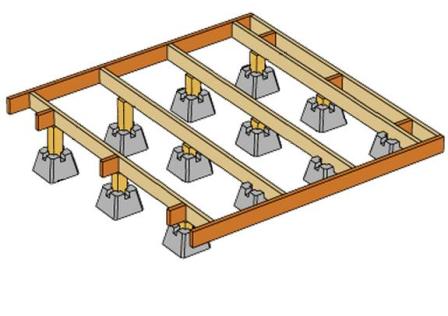
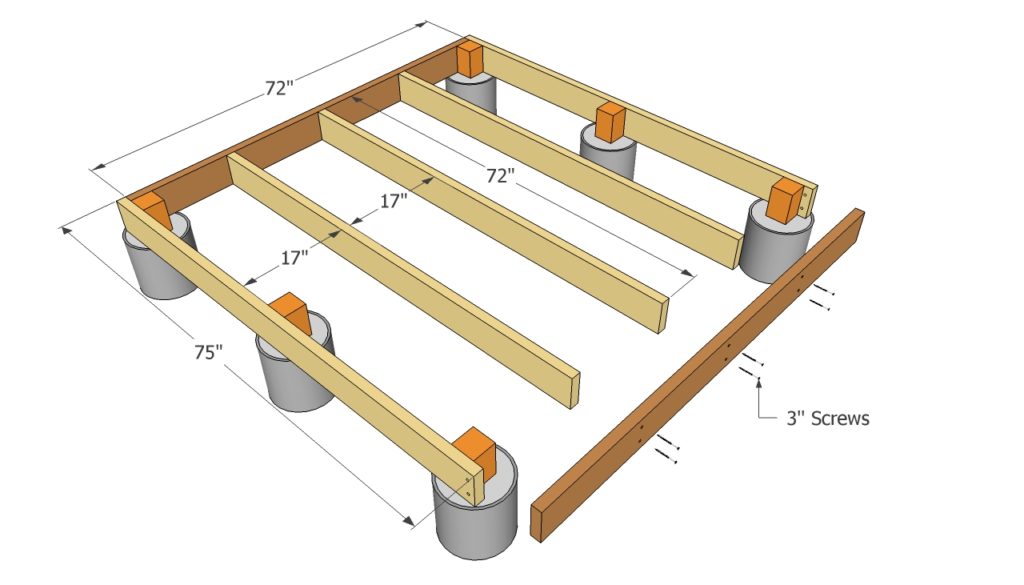
With any type of storage shed structure, you always start and build from the bottom.
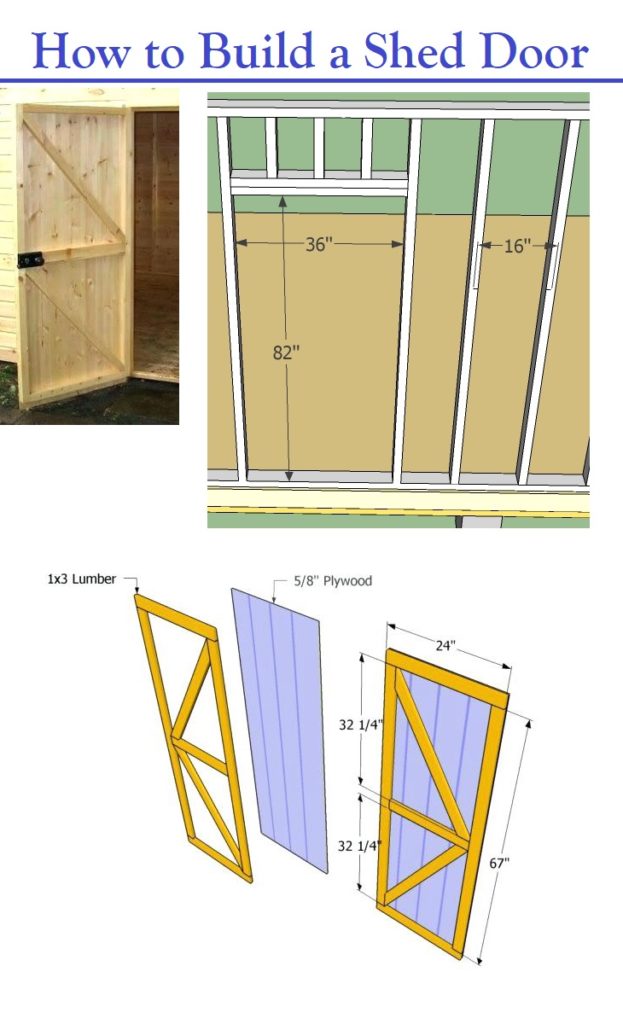
Start together with your floor deck moving on into your walls, windows, doors then on to your roof.

Make sure that your framing is secure and a solid stake is driven securely to the ground so that you have a sturdy post to attach your frame too.

Never skimp on nails or screws, make sure whatever fastener you use attach them securely to all parts of your wooden storage shed.

Try to wiggle or shake your walls to envision if they’re secure which there are no unwanted gaps. Any weak points should be strengthened.

Your roof ought to solely be designed to be strong and make certain that the framing is robust.

Choose a building material that will withstand the weather in your area. A metal roof is best in snowy areas.

If really necessary add more wood studs or posts as you want to make sure that your wood storage solid, secure, and sturdy. Remember, the bigger your shed is, the more pillars it would need.